
Introduction: Excel Custom List Creation
Do you often find yourself inputting the same sets of data into your Microsoft Excel spreadsheets? Whether it’s department names, student names, or inventory details, repetitive data entry can be time-consuming. Fortunately, Excel offers a solution – custom lists. By creating custom lists, you can streamline your data entry process and improve accuracy. In this guide, we’ll explore how to create custom lists in Excel and leverage the powerful autofill feature.
Creating a Custom List in Excel
Custom lists in Excel are versatile and can be used as headings for columns, rows, or to populate dropdown lists for efficient data entry. Let’s delve into how to create your own custom lists in Excel.
1. Enter Your List Directly
- Open your Excel workbook.
- Click the File tab.
- Select Options on the left.
- In the Excel Options dialog box, click Advanced.
- Scroll down to the General section on the right and click Edit Custom Lists.
- In the Custom Lists box, select New List.
- Type your list items into the List entries box, one item per line, and click Add.

Image by:https://www.makeuseof.com/
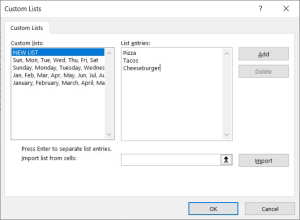
This method is ideal for short lists that are not present in your workbook’s worksheets.
2. Import Cells From a Worksheet
- Click the cell selector button on the Import list from cells box.
- Select the worksheet containing the list you want to import.
- Choose the range of cells containing the items in the list.
- Click the button on the right side of the Import list from cells box.
- Click Import.

Image by:https://www.makeuseof.com/
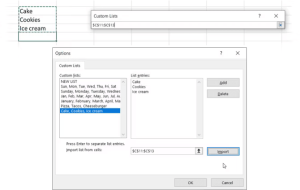
This method is useful when you have an existing list in your workbook that you want to convert into a custom list.
3. Import a List From a Named Cell Range
- Before opening the Custom Lists dialog box, enter each item in your list in a separate cell.
- Select the cells, enter a name for the range of selected cells in the Name Box, and press Enter.
- Open the Custom Lists dialog box.
- Enter an equal sign (=) followed by the name you assigned to the range of cells into the Import list from cells box.
- Click Import.

Image by:https://www.makeuseof.com/
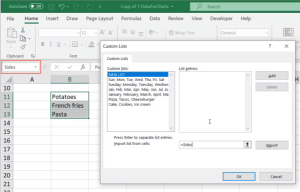
This method allows you to create a custom list from a named cell range, ensuring it’s available in any new or existing workbook.
Using AutoFill in Excel
Once you’ve created your custom list, you can harness Excel’s powerful AutoFill feature to streamline data entry. AutoFill automatically fills adjacent cells with your list items.
For example, if you have a custom list of department names (Accounting, HR, Marketing, Development, and Technical Support), you can type one of these names into a cell and use AutoFill to populate adjacent cells with the remaining department names.
To use AutoFill:
- Type an item from your custom list into a cell.
- Hover over the lower-right corner of the cell until it becomes a plus sign.
- Drag to the right or down to fill adjacent cells with list items.
- Release when you’ve filled the desired cells.

Image by:https://www.makeuseof.com/
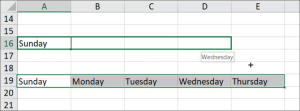
Excel is smart enough to cycle through the list if you drag across more cells than there are items in your list.
Creating a Custom List in Excel: Three Methods
| Method | Description |
|---|---|
| 1. Enter Your List Directly | Manually type your list items directly into Excel’s Custom Lists dialog box. |
| 2. Import Cells From a Worksheet | Import an existing list from cells in one of your worksheets. |
| 3. Import a List From a Named Cell Range | Create a custom list by importing data from a named range of cells. |
Examples of Custom Excel Lists
Custom lists can significantly enhance data entry efficiency in various scenarios. Here are three examples of custom Excel lists:
- Department Names: If you manage spreadsheets for different company departments, create a custom list containing department names (e.g., Accounting, HR, Marketing). This list simplifies data entry and ensures consistency.
- Student Names: Teachers can create a custom list of student names, making it easy to insert this list into rows or columns for tracking grades or attendance.
- Clothing Inventory: For tracking clothing inventory, create custom lists for sizes (S, M, L, XL, XXL), styles (crew neck, V-neck, mock neck), and colors (Black, White, Gray, Blue, Red). These lists enable the creation of consistent dropdown options.
Examples of Custom Excel Lists
| Scenario | Custom List Contents |
|---|---|
| Company Departments | Accounting, HR, Marketing, Development, Technical Support |
| Student Records | Names of students in a class |
| Clothing Inventory | Sizes (S, M, L, XL, XXL), Styles (crew neck, V-neck, mock neck), Colors (Black, White, Gray, Blue, Red) |
Feel free to incorporate this table into the article where it fits best
Conclusion
Custom lists in Microsoft Excel are a valuable tool for streamlining data entry and maintaining consistency in your spreadsheets. By following the steps outlined in this guide, you can create custom lists with ease and use the powerful AutoFill feature to save time and reduce errors. Whether you’re managing departmental data, student records, or inventory details, custom lists will enhance your Excel experience and boost productivity.
Remember: Once you add a custom list to Excel, it’s available for use in all your new and existing spreadsheets, making it a versatile and time-saving feature.