Introduction
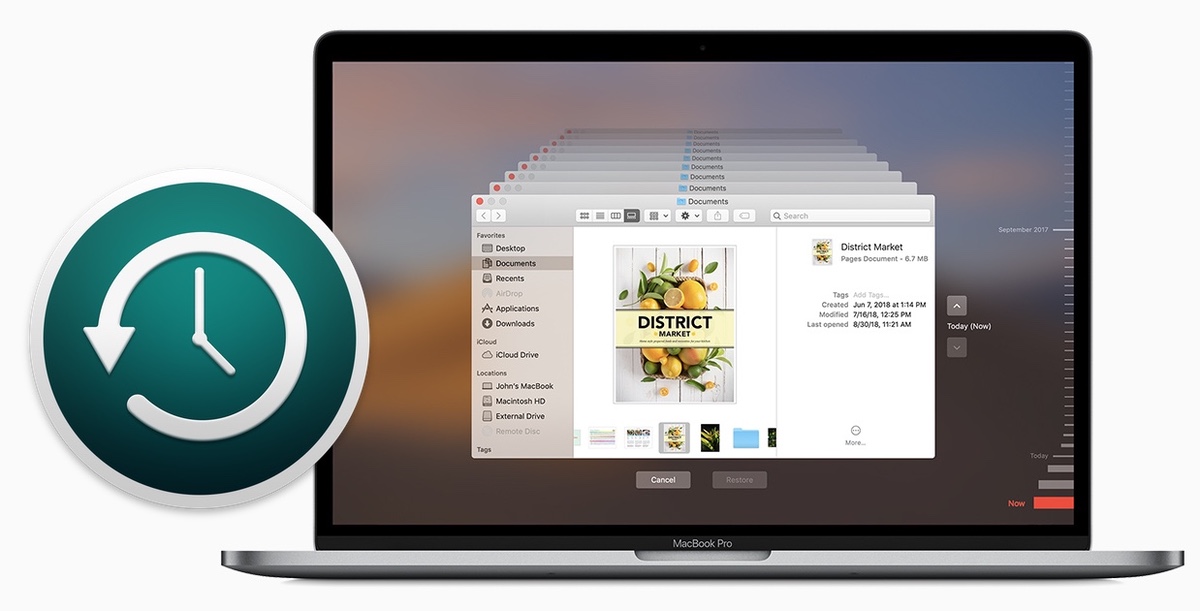
Safeguarding your critical documents using your Mac is vital. Backup System offers a dependable and easy way to produce self-regulating backups effortlessly. Through Time Machine, the backup feature that comes with your Mac, you can secure your files, applications, music, photos, emails, and documents. In this manual, we will guide you step by step the method of establishing the data backup tool. I will also guarantee that your files is securely archived.
Link External Memory Device for File Backup
To start backups using Time Machine, you will require an outside storage device including a USB drive or Thunderbolt storage. It’s essential to allocate this device exclusively to Time Machine copies. Avoid make use of it to store different files. Ideally, the backup drive must have at a minimum of two times the available space of every disk or volume you aim to create backups for. In case the backup disk is insufficient in capacity for a comprehensive backup, Time Machine will inform you.
Choose Your Memory Device within Time Machine Options
If you plug in the external drive to your computer, you could receive a notification to employ it for backing up with Time Machine. Nevertheless, one has the option for utilizing it for different uses for example, keeping files or moving information. If it doesn’t, follow these steps:
For macOS Ventura or later, you can follow these steps to access Time Machine settings: 1. Navigate to the menu of Apple by selecting the symbol with the Apple situated in the topmost left area on your display. 2. By chooseing menu options, select “Settings for the system”. 3. Within the System Preferences window, you can observe a vertical menu towards the left. Tap on “Main” for accessing the Primary settings. 4. To the right located in the General settings, you can locate the selection named “Time Machine”. Tap on it to open Time Machine options. Press the plus button (+) and proceed with the steps to opt for your external data storage as the location for the backup. Upon choosing your chosen device, you can continue with backing up your data.
For earlier macOS versions: Navigate to menu bar > Settings > Backup. Tap “Choose Backup Drive” and adhere to the guidance provided on the screen to pick your external backup device.
In case the storage device has already has Time Machine backups of another Mac, there is a possibility need to claim those backups as a part of the backups associated with your existing Mac. In another option, you have the option to commence a different backup instead.
Making Automatic and Manual Backups
Once configure an external hard drive as the chosen backup target, Time Machine will kick off creating regular backups. This will make hourly copies over the last 24 hours. Regular backups in the last month, alongside weekly backups for earlier months. The most ancient copies will be erased once the storage device is completely occupied.
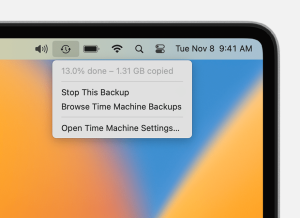
Backup is underway
To initiate manually a data backup, without having to wait for the upcoming automated backup, you have the option to select “Begin Backup Now” from the Time Machine configuration on the menu panel.

Backup is completed
Using macOS Ventura and subsequent releases, you are able to customize the interval between backups in line with your individual preferences. Access Time Machine settings, pick “Options,” and pick a setting from the “Back up frequency” menu.
The first backup might require some time, however, future backups will occur more quickly due to Time Machine solely copies files that have been edited since the previous backup.
Additional Pointers and Exceptions for Backup Copies
One can personalize your backup files by removing particular items. To achieve this, access the Time Machine configuration. Press “Settings” then utilize the plus (+) button to append items to be left out. In case you want to no longer exclude a product, pick it and press the discard (x) button.
For individuals who backup to several drives, pressing the Option key and selecting “Explore Other Backup Drives” from the Time Machine options allows access to different backup hard disks.
Don’t forget to look into different backup and data recovery approaches to achieve thorough data protection.
By adhering to these instructions, you can securely employ Time Machine to produce backups of your Macintosh. This ensures a sense of security, with the knowledge that your information is secure and can be restored should there be data deletion or sudden complications. Allocate some time for configuring Backup system and ensure the safety of your online presence at this moment.