Custom Mechanical Keyboards
Are you tired of using the same generic keyboards that come with your computer? Do you want to elevate your typing experience to a whole new level? Look no further! Custom mechanical keyboards are the answer. In this guide, we will delve into the world of custom mechanical keyboards and help you craft your perfect typing experience.
Understanding Custom Mechanical Keyboards
Before diving into the building process, it’s essential to understand what custom mechanical keyboards are. Unlike conventional rubber dome keyboards, mechanical keyboards use individual switches for each key. These switches come in various types, each offering unique typing experiences – from clicky and tactile to smooth and silent.

Choosing the Right Components for Your Build
Building a custom mechanical keyboard involves selecting various components to suit your preferences. The first and most crucial component is the switch. Depending on whether you prefer a satisfying click with each keystroke or a smooth and quiet feel, you’ll choose the appropriate switch type.
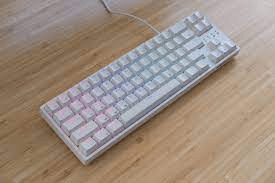
Next, you’ll need to choose the keycaps – the visible part of the keyboard. Keycaps come in different materials, shapes, and sizes, allowing you to personalize the keyboard’s look and feel. Whether you want a minimalist design or a colorful and eye-catching one, the choice is yours!
In addition to switches and keycaps, you’ll also need a PCB (Printed Circuit Board), a case to hold all the components together, stabilizers for larger keys, and a cable to connect your keyboard to the computer. Understanding these components and their compatibility is essential for a successful build.
Building Your Custom Mechanical Keyboard Step-by-Step
Now that you’ve gathered all the necessary components, it’s time to put them all together. Building a custom mechanical keyboard can be a rewarding and enjoyable experience, but it requires patience and attention to detail. Let’s go through the step-by-step process:
- Prepare your workspace: Clear a well-lit and organized area to work on your keyboard comfortably. Gather all the tools you’ll need for the assembly.
- Mount switches onto the PCB: Carefully solder each switch onto the PCB, ensuring they are aligned correctly.
- Install stabilizers: Stabilizers are essential for larger keys like the spacebar and enter key. Install them properly to prevent any wobbliness.
- Attach the PCB to the case: Carefully place the PCB inside the case and secure it properly.
- Add keycaps: Place each keycap on its corresponding switch, making sure they are all seated correctly.
- Test your keyboard: Before fully assembling the keyboard, connect it to your computer and test all the keys to ensure they are working correctly.
- Assemble the case: Once you’ve confirmed that all the keys are working, finish assembling the case and secure all the components in place.
Customizing Your Typing Experience
One of the main advantages of custom mechanical keyboards is the ability to customize your typing experience fully. Apart from choosing the type of switches and keycaps, you can also fine-tune the keyboard’s functionality with various firmware options. QMK and VIA are popular firmware choices that allow you to remap keys, create macros, and customize the keyboard’s behavior.
Additionally, custom mechanical keyboards often support hot-swapping, which means you can change the switches without soldering. This feature gives you the freedom to experiment with different switches and find the ones that best suit your preferences.
Finding the perfect layout is another aspect of customization. Whether you prefer a standard layout, an ergonomic split design, or a compact 40% layout, there are various options to explore.
Conclusion
Custom mechanical keyboards offer a unique and personalized typing experience that can significantly enhance your productivity and enjoyment. With the right components and some patience, building your custom keyboard can be a fulfilling DIY project. Remember to choose your components wisely, follow the step-by-step assembly process, and explore the various customization options to craft the perfect typing experience for you. Happy typing!