Introduction
Nothing’s more frustrating than an Ethernet connection not working on Windows 11 when you need reliable internet. Wired connections are usually faster and more stable than Wi-Fi, so when they fail, productivity and streaming grind to a halt. Fortunately, most Ethernet issues can be solved with a few simple steps. In this article, we’ll guide you through easy-to-follow fixes—from checking cables and restarting hardware to updating network drivers and resetting network settings. By the end, your Windows 11 PC should be back online, letting you enjoy smooth browsing, gaming, and video calls. Let’s get started!
How to Fix Your Ethernet Connection Not Working on Windows 11
Ethernet connections are known for their stability and reliability compared to Wi-Fi. However, they can also encounter issues, leaving you without an internet connection. In this guide, we will walk you through the steps to troubleshoot and fix Ethernet connection problems on Windows 11.
- Run the Network Adapter Troubleshooter: Windows 11 provides a built-in troubleshooter to handle common PC issues, including network problems. To use it for fixing the Ethernet not working issue:
- Press Win + I to open the Settings panel.
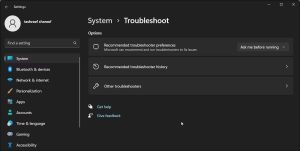
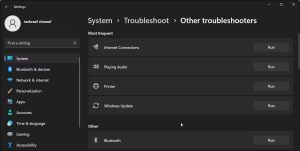
- Next, click on Other troubleshooters.
- Click the Run button for Internet Connections to launch the troubleshooter.
- Select Troubleshoot my connection to the Internet. The troubleshooter will look to identify the problem and recommend applicable fixes.
- Apply the fixes and close the troubleshooter to see if the issue is resolved.
If the problem persists, use the Network Adapter troubleshooter:
- Open Settings, and go to System > Troubleshoot > Other troubleshooters.
- In the right pane, scroll down and click on the Run button for Network Adapter
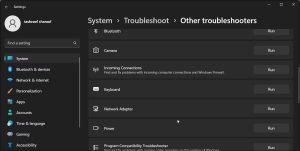
- In the Network Adapter troubleshooter dialog, select Ethernet.
- Click Next. Windows will look for any issue and recommend fixes if applicable.
Check Physical Connections
Before diving into software tweaks, verify your hardware:
- Inspect the Ethernet cable for breaks or kinks. A damaged cable can block data.
- Test different ports on your router or switch. Sometimes a port goes bad.
- Plug into another device (like a laptop) to confirm the cable and router port work.
- Ensure the Ethernet port’s LED lights on both PC and router glow green or orange when connected.
If the cable or port is faulty, replacing or moving to a working port often fixes the issue instantly.
Restart Your PC and Network Hardware
A quick reboot can clear many glitches:
- Shut down and restart your Windows 11 PC.
- Power-cycle your router and modem: unplug them for 30 seconds, then plug back in.
- Wait until all lights stabilize before testing the connection again.
Restarting resets temporary settings and reconnects your devices to the network. This simple step resolves up to 30% of network problems.
Run the Windows Network Troubleshooter
Windows 11 includes a built-in tool to spot and fix network errors:
- Press Win + I to open Settings.
- Go to System > Troubleshoot > Other troubleshooters.
- Click Run next to Network Adapter.
- Select your Ethernet adapter and follow the on-screen prompts.
The troubleshooter checks for misconfigurations and can automatically apply fixes, saving you manual effort.
Update Your Ethernet Network Driver
Outdated or corrupted drivers often cause connection failures:
- Right-click the Start button and select Device Manager.
- Expand Network adapters, right-click your Ethernet adapter, and choose Update driver.
- Select Search automatically for drivers.
- If Windows finds a newer driver, install it and restart your PC.
Alternatively, visit your PC or motherboard maker’s website to download the latest driver directly. A current driver ensures compatibility with Windows 11’s latest updates.
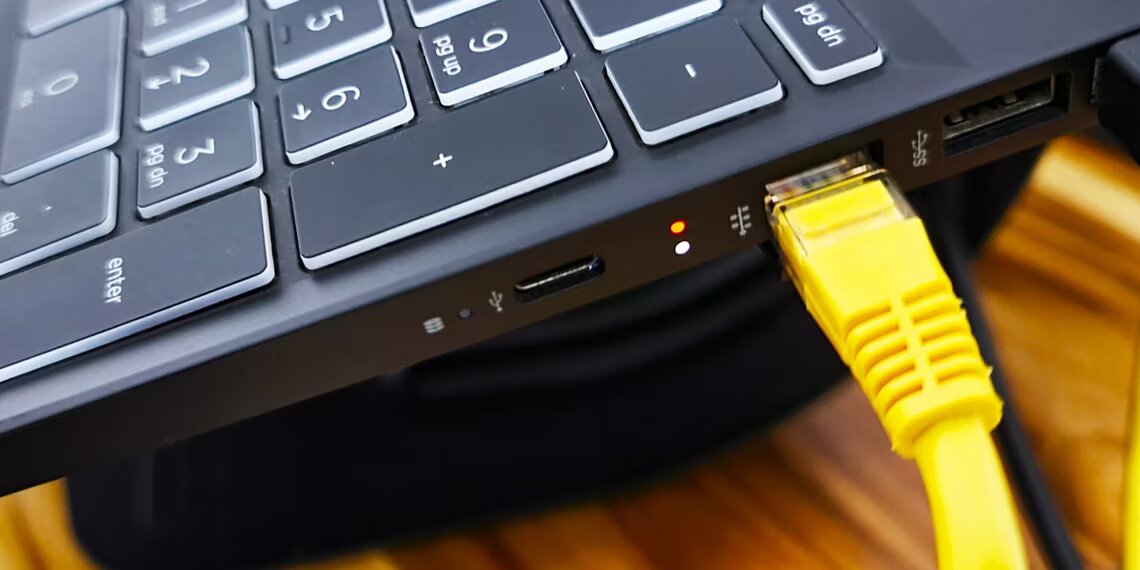
Check the Ethernet Cable, Port, and Connection
If you see the No Internet access message, it can be due to a loose Ethernet connection to your PC or the router. Disconnect the cable from your PC and router’s port. Then, reconnect the cable and watch for the click sound to ensure it’s firmly connected.
Your router has multiple ports. The Internet port is used to connect your router to the modem. Make sure the cable is connected to the Ethernet port and not the Internet port.
Try to connect using a different Ethernet cable. This will help you determine if the issue is with your cable or something else. If you are shopping for a new cable, explore our guide on choosing an Ethernet cable for your wired connection to make the best decision.
Additionally, try to use a different Ethernet port on your router. If it works, you may have a faulty port requiring attention.
Perform a Power Reset for Your Modem and Router
You can create a new connection with a quick power reset. Useful to fix issues triggered by a temporary glitch.
Note that your Internet will be temporarily unavailable during the power reset. Make sure to pause any activity that relies on an active Internet connection.
To power reset the modem and router:
- Unplug the router’s power brick from the wall outlet.
- Next, unplug the modem power brick from the power source.
- Leave the network devices idle for a minute or two.
- Plug in the power adapter for the router and then for the modem.
- The modem and router may take some time to power on fully. Wait for all the lights to stop blinking.
- Once done, check your PC to see if the Ethernet connection is restored.
Run Network Commands to Perform a Network Reset
Windows 11 features a bunch of useful commands to reset network devices and network stack to troubleshoot networking issues. Run the following command in the given order to reset your network settings successfully.
- Press Win + S to open Windows search.
- Type cmd, right-click on Command Prompt, and select Run as administrator.
- In the Command Prompt window, type the following command one by one and press Enter to execute:
- Press Win + S to open Windows search.
- Type cmd, right-click on Command Prompt, and select Run as administrator.
- In the Command Prompt window, type the following command one by one and press Enter to execute:
Bonus Tips
- Check antivirus/firewall settings: Temporarily disable third-party firewalls to see if they block Ethernet.
- Try Safe Mode with Networking: Boot into Safe Mode (hold Shift while clicking Restart) and choose Enable Networking. If Ethernet works there, a third-party app may be the culprit.
- Use an alternative adapter: Plug in a USB-to-Ethernet dongle. If it works, your built-in port might be faulty.
Conclusion
Ethernet connection problems on Windows 11 can be resolved through various troubleshooting steps. By following the methods outlined above, you can fix the Ethernet not working issue and enjoy a stable and reliable internet connection.
Fixing an Ethernet connection not working on Windows 11 often comes down to systematic troubleshooting. Start by checking cables and ports, then reboot your PC and router. Use Windows’ built-in troubleshooter, update network drivers, and reset TCP/IP and Winsock stacks. Toggling the adapter, verifying IP and DNS settings, and disabling power saving add further checks. When needed, reset network settings or update Windows and router firmware for a fresh start. By following these clear, step-by-step solutions, you’ll restore your wired connection quickly and enjoy reliable, high-speed internet on your Windows 11 machine again.