Introduction
Printing wirelessly from your macOS device has become incredibly convenient with technologies like AirPrint. Apple’s AirPrint allows users to print documents and images seamlessly from their Mac or iOS devices to AirPrint-enabled printers. While wireless printing is the norm, you might be surprised to know that AirPrint can also work over wired connections. This article guides you through the process of configuring and utilizing macOS AirPrint for wired printing on your Mac.
Step 1: Connect the Printer
Before you embark on the setup journey, ensure your printer supports AirPrint and is connected to your Mac via a USB cable. While most modern printers are AirPrint-compatible, it’s wise to cross-check with the printer’s documentation or the manufacturer’s website to confirm compatibility.
Step 2: Check Printer Setup
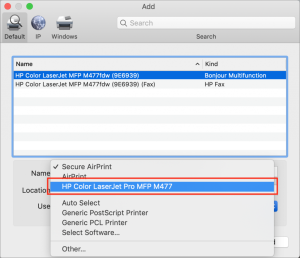
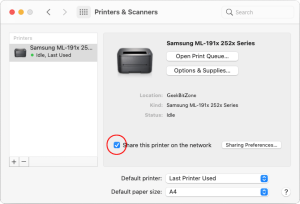
Double-check that your printer is appropriately set up and recognized by your macOS system. Access “System Preferences” and navigate to “Printers & Scanners.” If your printer is connected through USB and is macOS-compatible, it should appear automatically in the list of available printers.
Step 3: Print Using AirPrint
Now that your printer is connected and acknowledged, the time has come to use AirPrint for printing. Follow these steps:
- Open the document or image you intend to print.
- Click on “File” in the menu bar and select “Print.”
- In the ensuing print dialog, confirm that the correct printer (your AirPrint-enabled printer) is selected.
- Modify print settings as needed, such as page orientation, paper size, or the number of copies.
- Click the “Print” button to initiate the printing process to your AirPrint-enabled printer.
Image by:https://www.geekbitzone.com/
Step 4: Troubleshooting
Encountering glitches with AirPrint or your printer’s recognition? Employ these troubleshooting measures:
- Ensure your printer is powered on and properly connected via USB to your Mac.
- Validate that your printer’s drivers are up to date. Visit the manufacturer’s website for the latest macOS-compatible drivers.
- Reboot your Mac and retry the printing process.
- If your printer isn’t visible in “Printers & Scanners” preferences, manually add it using the “+” button. macOS should detect it if it’s compatible.
If challenges persist, consult your printer’s manual or the manufacturer’s support resources for further guidance.
Always keep in mind that the AirPrint configuration process could slightly differ based on the macOS version and printer model. For precise directions and updates tailored to your macOS version and printer, refer to the latest macOS documentation or the manufacturer’s support resources.

Print wirelessly with macOS AirPrint, regardless of whether you’re using a Mac or an iOS device. Most widely-used printers are AirPrint-enabled, making the wireless printing experience incredibly convenient. To begin, ensure your printer is on the same Wi-Fi network as your Mac. After confirming compatibility, follow these straightforward steps:
- Open your document on your Mac.
- Select “File” and choose “Print” in the application.
- Pick your AirPrint printer from the Printer menu.
- Set additional print preferences and click “Print.”
In case
You encounter issues, here are some suggestions to troubleshoot the problem:
- Confirm you’re using the latest macOS version. Navigate to Apple menu > System Settings > General > Software Update and install any listed updates.
- Consider connecting the AirPrint printer to your Wi-Fi network using a cable or bridging.
- Allow a moment for the printer to join the network after being powered up.
- For users of AirPort Base Station or AirPort Time Capsule, connect the printer through the Ethernet LAN port or Wi-Fi network. Note that USB-connected printers to an AirPort Base Station won’t support AirPrint.
Stay updated by checking for printer model-specific updates from the manufacturer. Whether it’s wireless or wired printing, macOS AirPrint offers convenience and flexibility for all your printing needs.


