
How to Set Working Hours in Google Calendar
Are you looking to streamline your schedule and let your colleagues know about your working hours for a specific day or week? Google Calendar’s “Working Hours” feature can help you achieve just that. In this guide, we’ll walk you through the steps to easily set your work hours in Google Calendar.
Google Calendar is an indispensable tool for efficiently managing your busy schedule and tasks. It empowers you to maintain a well-organized agenda, whether you’re working remotely or in a traditional office setting. Among its myriad features, the “Working Hours” feature stands out as a valuable asset.
What Is the Working Hours Feature?
The “Working Hours” feature in Google Calendar allows you to block off your out-of-office time, making it visible to others. By configuring your working hours, Google Calendar automatically marks you as unavailable for meetings and events during those times.
At present, the “Working Hours” feature is accessible to users with Google Calendar accounts associated with work or educational organizations. If you possess such an account and can’t locate the setting, don’t fret—simply contact your organization’s administrator for assistance.
Setting Your Working Hours in Google Calendar
Now, let’s dive into the steps for configuring your “Working Hours” in Google Calendar. Follow these straightforward instructions:
- Access Google Calendar: Open Google Calendar on your desktop.
- Navigate to Settings: In the top-right corner of your screen, click on the cogwheel icon, and then select “Settings.”
- Access Working Hours: Under the “General” section, locate and click on “Working Hours.”
- Enable the Feature: To activate the “Working Hours” feature, tick the box labeled “Enable working hours.”
- Select Your Working Days: Choose the days you are available for work by selecting the corresponding buttons for each day.
- Set Your Working Hours: Customize the working hours for each day by clicking on the time fields and adjusting them as needed.

Image by https://www.makeuseof.com/ Step Number Description 1 Access Google Calendar on your desktop. 2 Click on the cogwheel icon in the top-right corner and select “Settings.” 3 Under the “General” section, choose “Working Hours.” 4 Enable the “Working Hours” feature by checking the “Enable working hours” box. 5 Select the days you are available for work by clicking the corresponding buttons for each day. 6 Customize your working hours for each day by adjusting the time fields. 7 Save your settings. By following these steps, you can efficiently set your working hours in Google Calendar, enhancing your productivity and schedule management.
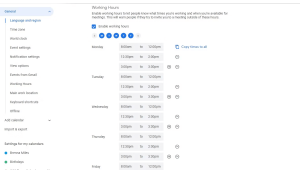
That’s it! If your working hours remain consistent throughout the week, you can save time by selecting “Copy times to all.” Your settings will be automatically saved once you’re finished.
Enhance Your Productivity with Google Calendar
The “Working Hours” feature is just one of the many productivity tools available within Google Calendar. It offers remarkable flexibility to align with your unique work habits. Take some time to explore the array of settings in Google Calendar and discover how it can elevate your productivity.
Unlock the potential of Google Calendar and optimize your schedule effortlessly. Whether you’re coordinating with colleagues or managing personal commitments, Google Calendar is your trusted ally in staying organized and efficient.